Wednesday, November 25, 2009

Neon Leaner


Ben Wilson of Wilson Brothers Design made this neon-encased leaning quadricycle for a couple of Art Car parades in Manchester and Edinburgh. Talk about nighttime road visibility! Silly me, with just my Down Low Glow light.

Thursday, July 16, 2009

A Bevy Of Brass Lions


Some recently acquired artifacts of a distinctly brassy liony nature.
What could I possibly have planned for them?

Saturday, April 25, 2009

Silver Fox Video

Video of the Silver Fox trike all lit up at night with our homemade lights:

Saturday, April 18, 2009

Presenting The Silver Fox Tadpole Trike

We've concluded our work on our second trike, the aluminum trike covered in previous posts. We've dubbed it the Silver Fox, and it sports our homebuilt LED lights in nice chrome Art Deco housings, white wall tyres, chrome fenders, amber Down Low Glow tube and fox hood ornament. Check it out!


Here is the Flickr set.

Sunday, March 29, 2009

White Lights

Okay, so I previously covered the creation of the tail lights for the trike, so now I am going to cover the headlights. The circuit is the same, but the white LEDs have different voltage and current requirements so they will need different resistors. So I'll begin with a parts list:


It's the same idea as before, only the white LEDs are shaped differently because they have their own heatsink that they are mounted on. The two bullet lights are going to be smaller side lamps, while a large bullet headlight is going to be the main headlight.

I am reposting the circuit diagram here for reference:


So to begin with, I gave the white LEDs a test to check their brightness. Here's a photo of the test:


I soldered wires to the LEDs:


Then I mounted the LEDs in the white bullet lights:


I also used the larger white bullet light which is to be the main headlight:


Here it is opened up. I removed the light bulb but did not bother removing the battery case, as it was riveted in place and would have been very difficult to remove without damaging anything:


Then all that remained was to mount the lights. I mounted the headlight on the front derailler bar:


Here's a good photo of the white LED in the front lamp:


I mounted the rear bullet lights using some of the premade mounting holes on the trike frame. Also visible are the wire crimps I used to connect up the whole trike. I am going to put black heat-shrink tubing over the crimps so they're not quite so visible:


The large rear lamp was mounted to the rear fender. I drilled a 1/4" hole, and the light included all the mounting hardware:


Here is a couple of photos of all the tail lights together:


And finally, a view of the front bullet lights. The fender mounts had these cool little mount points that ended up being perfect for the lights:


Finally, all the wires (made of black 20 gauge lamp wire held in place by black zip ties) were run to a bag strapped behind the seat. The bag is just the right size to hold the electronics box:


And there you go! The lights are bright as heck! I calculated the batteries as lasting around 2.5 hours, but we haven't tested the system to that limit yet, as we generally recharge the batteries after every ride anyway.

Thursday, March 26, 2009

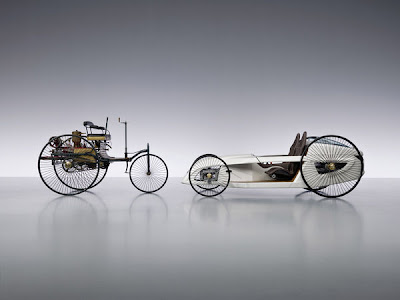
Mercedes Steamy Hommage To The First Automobile


This concept car from Mercedes-Benz inspired by the very first Benz is undeniably Steamy in pedigree. It wouldn't make a bad pedalcar either. ;)

Via Jalopnik.

Friday, March 20, 2009

Form And Function: Columbine Bicycle Works


Hours of staring online at bicycles and the art of making them until my eyes cease to function has taught me no one makes a more beautiful bike than Columbine Bicycle Works. I enjoy staring at beautiful triumphs of the craftsmanship of Man, so if you believe my assumption to be false by all means show me beautiful bicycles.

But Columbine doesn't just produce eye candy, form follows function as they are glad to point out and their bicycles prove it with world class artifice.

Tuesday, March 10, 2009

The Morgan Motor Company Pedal Car

The fine folks at the Morgan Motor Company, makers of beautiful British three-wheeled automobiles, celebrated their hundredth anniversary with a two-thirds scale kiddie version that is pedal powered. Thus created the most awesome tadpole trike in the world.


Morgan Pedal Car

Wednesday, February 11, 2009

Nightlights

Here's the aluminum tadpole trike all lit up with our DIY bike lights, as well as the Down Low Glow light:


The tail lights are in fact so bright, every bit as bright as automobile tail lights, that I may only use one- they're liable to annoy cyclists behind me.

Tuesday, February 10, 2009

Thursday Tweed Ride in SF


Inspired by the London Tweed Run, an enterprising young chap has started the Thursday Tweed Ride in San Francisco February 12. As Jake Von Slatt said, "Darn wrong coast again!" Well Mr. Von Slatt, perhaps we should start an East Coast Tweed Run. Surely there's enough Old World Tweed types around for the task at hand. Perhaps an Autumn run to offset the west coast not-quite-spring run.

CatCubed, Cyclelicio.us, Laughing Squid; Jake Von Slatt for pointing it out.

Friday, February 6, 2009

Dressing Up The New Trike

We've begun the process of fancifying the new aluminum trike- the lights in the previous article are part of that process. We're going for an Art Deco theme. An easy theme to go with since Art Deco and bikes go together like toast and jam. Think of all that chrome and curves and shiny bits and so forth on classic bikes and then realize it's Art Deco. I'll certainly take it over garish logos on every single surface.

As a first step we've put white wall tyres on the trike. Compare the photo below to older pics of the trike and I think you'll see it's already an improvement. Soon the trike will also have shiny fenders with killer lights mounted, and various other happy curvy bits. I'll need a little something extra to make it special... also the trike will need a name. What do you think? I'm thinking of going with Silver Fox.


Just as a side note I originally intended to go with Art Deco for the Brass Lion, but something about the high-off-the-ground profile of the Streetfox tadpole trike from Atomic Zombie that the Brass Lion is based on seemed kinda old-fashioned as in 1886 Benz. So I went Steampunk or Neo-Victorian.

As a second aside, I consider Steampunk and Art Deco to be fundamentally aesthetic opposites though they are both quite beautiful and concerned with craftsmanship and functionality as well as aesthetics. The fundamental difference is that Steampunk likes to see the working bits- let the guts hang out! Show us the gears, and the more the better! Art Deco likes to cover the functional bits with fairings and housings considering the guts to some degree to be unappealing, and certainly less aerodynamic.

Monday, February 2, 2009

Let's Light Things Up

All right, so I have wired up a sweet set of lights for all purpose triking needs.  We wanted a good high-powered set of LED lights, but there are problems with premade lights:
-They are too dim
-Alternately, they are bright but very expensive, and
-They universally look boring

We found a cool set of art-deco style bullet lights at BikeWorld USA in both clear and red:
-Clear bullet lights
-Red bullet lights
-Large red bullet light with fins

These are the perfect art-deco style light, but the problem is they have crappy low-powered light bulbs. The solution then was to buy the bullet lights, but remove the light bulbs and add our own high-powered LEDs. Thus there are 2 parts to this project, swapping the lamps for LEDs, and creating support electronics for the lamps. At this point in time only the tail-lights are finished, so I am going to detail the build of the tail lights.

Parts List:
(Relevant data sheets are linked)


So, let me start off at the lamps themselves. The lamps needed to have the light bulbs removed, and the LEDs mounted. I also decided that the lamps needed sealing, as they did not come with any sort of seal where the wire enters.

So let's start with a bullet light:


This is the bullet light disassembled, with the light bulb and wiring removed:


I soldered wires onto the leads of the LED and ran the wires into the lamp:


I then used a dab of epoxy to seal the back of the lamp, where the wires stick out. The epoxy was left to dry for 24 hours.

I repeated this process for the second red bullet light.

Now let's look at the red bullet light with fins:


Internals removed, LED added:


As before, where the wires exit the lamp was sealed with epoxy and left to dry.

For both types of lamp, the epoxy was plenty strong enough to hold the LEDs in place, so no additional mounting was necessary.

Now, I needed support electronics to actually power the LEDs. I wanted the electronics to be usable with both battery (DC) power and generator (AC) power, which is the reason for the bridge rectifier and voltage regulator.

The circuit is shown below:


The schematic above includes the white LEDs, which I will cover in a future post. The battery in the schematic can be replaced with a bike generator, as long as it is at least 7 volts. 12 volts is a common bike generator output, which would work for this build. I plan on eventually adding a switch so that the lights can be flipped between generator and battery power, but that is not in this current build.

I don't have a PCB layout for this circuit as that was a bit beyond the scope of the project and I lack access to PCB etching equipment. I fit all the parts onto a two inch by two inch circuit board. I added a heatsink to the voltage regulator, I'm not actually sure how necessary it is but I had some heat sinks sitting in my parts box and it seemed like a good precaution. The resistors in this circuit are going to be sinking a fair amount of power, so don't use puny 1/4 watt resistors. I used 3 watt resistors for the red LEDs.

The finished circuit is shown below. I labelled parts for your reference.


The circuit board and batteries will be going in the metal weatherproof project box.


I epoxied fabric down where the circuit board will sit in order to prevent short circuits.


I also mounted the power switch by drilling a hole (1/4 inch) and bolting the switch down.


I also put fabric on the bottom of the battery holders, because they had exposed contacts, and I didn't want them rubbing against the metal project box and shorting out.


Finally, I crammed the whole thing into the box. The box now holds the circuit board and two battery holders which each hold 4 rechargeable AA batteries. I also used the same 1/4 inch drill bit to drill a pair of holes, one for the black ground wires and one for the red +5v wires. I will be running 3 taillights with this box (and eventually 3 headlights as well).


And finally, with the cover added:


Now, the lamps are as-of-yet not mounted on the trike, but I wanted to preview their brightness, so here are a couple of pictures with the lit lamps.


And there you have it! In future posts I will cover the headlights as well as the mounting of the lights onto the trike itself. Take care!

-Alan